
The Multi-Show Dilemma: How to Adapt One Hero Concept Across Different Hall Layouts
You’ve spent weeks perfecting a stunning 10x8m island booth concept. The client loves it, the board has approved it, and it crushed the first event of the annual programme.
Then comes the rest of the show calendar.
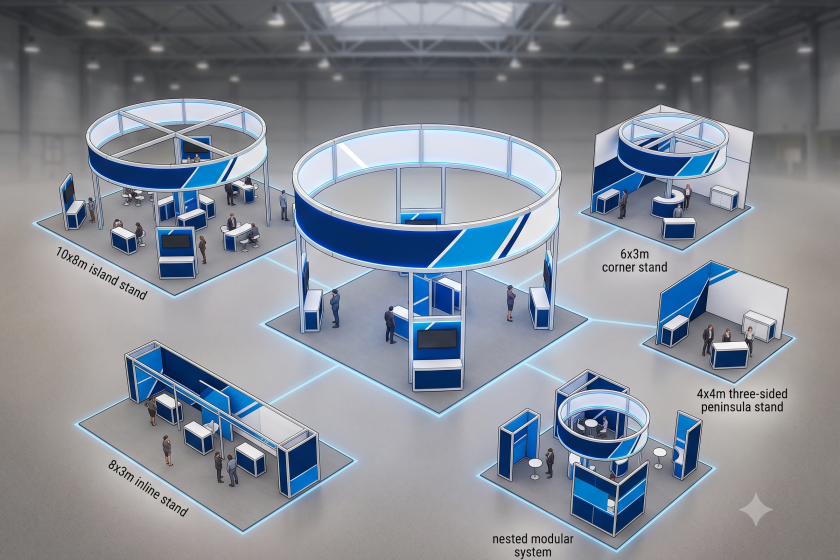
Show #2 is a 6x3m corner plot. Show #3 is a 4x4m three-sided peninsula. Show #4 is an awkward 8x3m inline space stuck against an exhibition hall wall.
Suddenly, your creative team is dragged right back into the redesign queue. You are re-rendering, re-dimensioning, and re-presenting four separate times for the exact same campaign message.
It’s what we call the “re-adaptation tax”—and it quietly drains creative agency resources, delays approvals, and inflates design costs across the season.
Designing for trade shows in 2026 isn’t about creating a single static build. It’s about creating an elastic spatial system that stretches or shrinks without losing brand coherence. Here is the practical playbook for multi-show stand design.
Why Traditional Concept Adaptations Fail
When an agency tries to squish a large island stand into a smaller space, one of two mistakes usually happens:
-
The Clutter Trap: Trying to force every single element from the 80sqm concept into a 20sqm plot. The result is a cramped, claustrophobic booth where visitors feel trapped and staff have nowhere to stand.
-
The Identity Loss: Stripping away so many architectural features that the smaller stand looks like a generic hire kit, completely detached from the hero concept.
The root cause? Treating each footprint as a brand-new design project rather than applying a scalable spatial framework.
The 4-Layer Spatial System for Scalable Stands
To make a single concept work across a 100sqm island, a 36sqm peninsula, and an 18sqm corner, break your master design down into four distinct layers:
1. The Core Spatial Anchor
This is the non-negotiable visual marker that defines the brand identity from across the hall. Whether it’s an illuminated overhead arch, a central curved canopy, or a high-impact graphic tower, this element must be designed to scale vertically or horizontally using modular connections.
2. The Plug-and-Play Functional Zones
Divide your booth functions into standalone “spatial blocks”:
-
The Welcome/Reception Block
-
The Demo Station Block
-
The Hospitality/Meeting Block
On an island layout, you deploy all three blocks with wide circulation paths. On a smaller corner plot, you drop the formal hospitality lounge and merge the reception and demo blocks into a single streamlined counter.
3. The Perimeter Wall Logic
Walls behave differently depending on open sides. A master concept must define explicit rules for open vs. closed edges:
-
Island (4 open sides): Low-level zoning, suspended features, clear sightlines across all axes.
-
Peninsula (3 open sides): Single rear feature wall containing heavy graphics and AV.
-
Corner (2 open sides): L-shaped backwall system that anchors the space while keeping entry points clear.
4. Standardised Graphic Grids
Design all primary graphic panels around standard modular dimensions (e.g., 1m, 2m, or 3m widths). When you drop from a 10m backwall to a 6m backwall, you simply unclip two panel units without having to redesign the artwork layout from scratch.
Old Way vs. New Way: Adapting Across the Calendar
The Old Way (Manual Redesign Loop)
-
Re-building 3D CAD models from scratch for every single footprint change on the calendar.
-
Waiting days for new render outputs whenever a show organizer assigns a new stand location.
-
Inconsistent brand presentation between major international expos and smaller niche regional events.
The New Way (Elastic Spatial Systems)
-
Establishing a master architectural framework that scales up or down using modular rules.
-
Generating spatial adaptations in minutes to secure early client alignment and sign-off.
-
Maintaining a flawless, instantly recognizable visual identity at every single event on the calendar.
The Multi-Show Adaptation Checklist
Before finalizing a master booth design for an annual client campaign, run through this spatial scalability checklist:
-
Footprint Scaling: Has the concept been test-fitted into both the largest (e.g., island) and smallest (e.g., corner) proposed footprints?
-
Sightline Integrity: Will the core brand headline remain visible at a 2.5m wall height if overhead rigging is banned at smaller venues?
-
Zone Prioritisation: Is there a clear hierarchy stating which functional zone gets dropped first when square metreage is reduced?
-
Furniture Consistency: Are the furniture pieces (stools, counters, display plinths) identical across all layouts to allow reusability from storage?
-
AV Modular Integration: Can the main video screen content be displayed on a single 75-inch screen for small stands OR a seamless LED wall for large stands without re-editing the video aspect ratio?
Where ExpoBooth.ai Fits
The hardest part of managing a multi-show campaign isn’t coming up with the master idea—it’s proving to the client how that idea will look across five different hall layouts before they commit budget.
ExpoBooth.ai allows agencies to explore spatial re-configurations in seconds.
By inputting your master brief, brand assets, and structural guidelines, you can rapidly generate coherent visualisations across multiple booth sizes and orientations—from 10x10m islands to 6x3m peninsulas. Combined with human-in-the-loop supervision, you ensure every spatial variation remains structurally realistic, strictly on-brand, and pitch-ready without swamping your design team.
The Takeaway
A truly great exhibition concept isn’t defined by how big it is. It’s defined by how intelligently it adapts.
By building an elastic spatial system from Day 1, you eliminate the endless redesign loop, protect your agency’s creative margins, and deliver a seamless brand experience across every show on the annual calendar.
Stop starting from scratch for every venue. Build the master system, adapt at speed, and win the entire season.